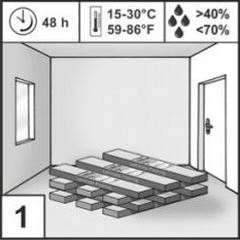
The purchased coating elements must be kept indoors for at least 48 hours before installation, at a temperature of 15-30 ° C, humidity 40-70%, so that the parts adapt to the room climate and take appropriate dimensions.
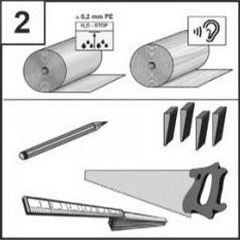
To lay the coating indoors, you will need:
- a substrate for leveling the roughness of the rough floor and evenly distributing the entire load over the surface of the floor covering, as well as for sound, heat and waterproofing;
- pencil for taking notes and drawing cut lines;
- spacer wedges to maintain a predetermined distance between walls and coating elements;
- ruler or tape measure for measuring sections, segments of elements;
- a saw or jigsaw for shortening coating details or for creating rounded contours.
Additionally, if masking of expansion joints / gaps is assumed during installation, a decorative profile will be needed.
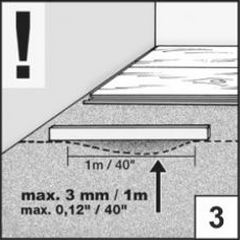
The floor base should be smooth, clean and dry. Irregularities of the base with a size of more than 3 mm per 1 m of the site should be aligned. If you have an old wooden floor, check it for stiffness. If the boards bend even from human weight, then they need to be replaced or strengthened. If you have a mineral base (concrete screed), it is necessary, as in the case of a wooden floor, to check its horizontality. If any small deviations are detected, perform alignment. The floor arrangement must be carried out in accordance with TCP 45-5.09-128-2009* (02250).
Check the coating elements for irregularities, mechanical damage, and color deviations in good light. Do not use defective parts in your work.
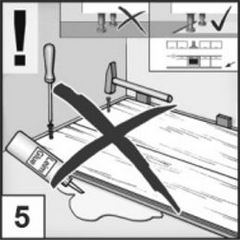
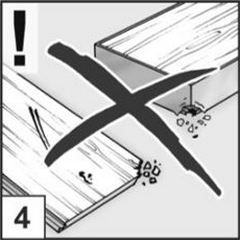
Laminate floor coverings are laid in a "floating" state. They can not be glued, fixed with hardware to the base. It is not recommended to place very heavy objects filling the room (furniture, equipment), for example, built-in kitchens, also have a fixing effect. First, it is recommended to install a built-in kitchen and cabinets before installation, and the coating elements should be laid only up to the base.
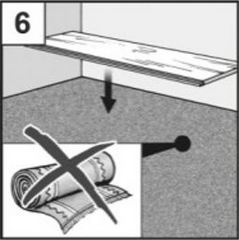
The carpet must be removed, it is not suitable as a base for floor coverings. Due to the carpet covering lying under the elements, problems arise when laying parts. When walking, a springy movement occurs, which destroys the groove-ridge connection and leads to rupture.
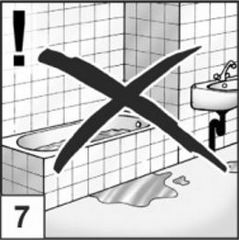
The coatings are not suitable for rooms exposed to prolonged exposure to humidity, for example, baths, saunas, bathrooms, with the exception of kitchens.
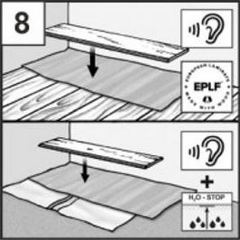
Laying of a polyethylene film on a wooden base is not allowed. You can lay foil to keep the room warm. Place the foil in parallel with the laying of the elements. Before laying the elements on a mineral base, use a polyethylene foam film to protect against moisture. Lay it perpendicular to the direction of laying the parts. In this case, the overlap of adjacent strips should be at least 20 cm. Additionally, connect the overlaps in several places with adhesive tape. In order to increase the thermal insulation properties, foil can be additionally laid. Make sure that the foil joints are not directly under the joints of the parts to be laid.
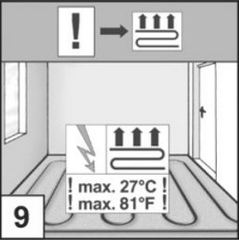
The use of heating is possible only if the heating is working properly. Underfloor heating must be used throughout the entire area of the room. Partial floor heating is not allowed. The temperature of the heating elements adjacent to the underside of the coating parts should not exceed 27 °C at any time at any point in the area.
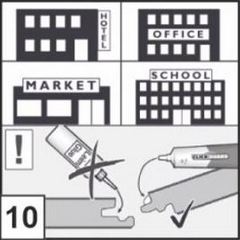
It is recommended to install a lock joint on a sealant in public buildings for longer operation and preservation of the aesthetic properties of the floor during operation. This method of laying increases the wear resistance of the coating, and also prevents the divergence of the joining seams.
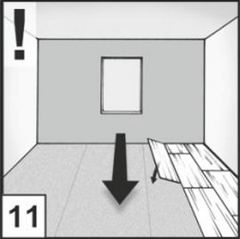
Select the direction of laying the coating. If the windows are located on one wall of the room, it is recommended to use direct laying of the coating elements along the direction of sunlight. This is due to the fact that when laying across the direction of the light source, the joints of the coating will be more noticeable. When laying the coating along the light stream, the effect of an "endless board" is created.
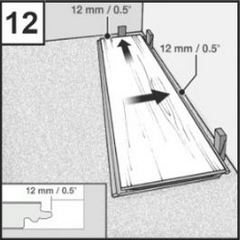
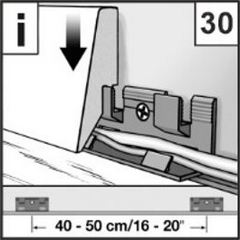
The coatings are laid with the obligatory observance of a compensation distance of at least 10 mm to the edge of the walls. Compensation distances are fixed using spacer wedges. Please note that in rooms with a length of more than 12 m, the gap must be increased. Its size is calculated based on the ratio of 1.5 mm per one meter of length.
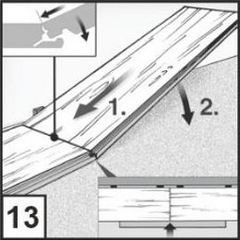
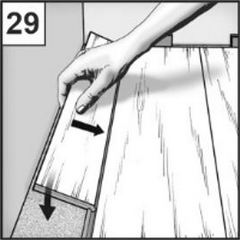
It is optimal to start by using a tape measure to measure the width of the room and calculate the width of the coating elements of the last row laid out along the wall. If the width is less than 5 cm, then it is necessary to cut the parts in the first and last rows so that their width is the same. At the same time, it is necessary to take into account the gap from each wall, which should be at least 10 mm. We recommend starting the installation from the left corner of the room. For indirect walls, it is necessary to first transfer the profile of the wall line to the first row of coating elements and cut them accordingly. At the same time, as already mentioned, spacer wedges with a thickness of 10 mm are installed near the walls, which will serve as a future gap. After finishing the work, the wedges are removed. The gaps are necessary so that the coating does not "stand on end" as a result of thermal expansion. Connect the short sides of the elements at an angle of 30 degrees with a downward shift and simultaneously pressing forward. Repeat for the remaining coating elements in the first row. Be sure that the long edges lie in a row so that there are no distortions and a straight line is formed. This is necessary so that the elements of the second row can be installed without gaps in the longitudinal profile of the part.
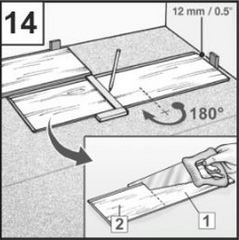
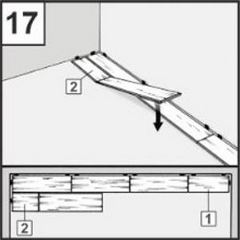
To determine the length of the last element in the row, turn the last part 180°, with the back side up, then fix it with spacer wedges, next to the previously laid row, make a mark, and then saw off. Turn the part in reverse order, fix the locking connection.
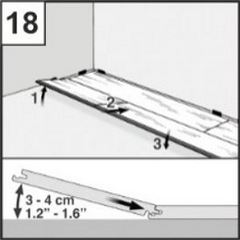
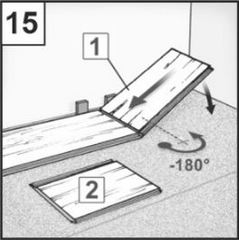
Start laying the elements of the second row with a cut piece of the element that remained after laying the previous row, if it is more than 30 cm long. The offset of the transverse seam must be at least 30 cm from row to row. Don't forget to leave a gap along the short side of the element. Arrange the coating elements of the second row in such a way that the elements of the 1st and 2nd rows are parallel to each other, but do not snap. Lay out the elements of the 2nd row to the end. As soon as the entire 2nd row turns out to be with the 1st row, connect several parts along the short side by fixing the lock connection. Then lift the docked elements by 3-4 cm. Carefully insert the ridge of the long edge of the coating elements of the 2nd row into the groove of the edge length of the coating elements of the 1st row at an angle. Press forward and fold. Make sure that the coating elements are flat. Continue laying the elements, making sure to dock the short sides first and then the long sides.
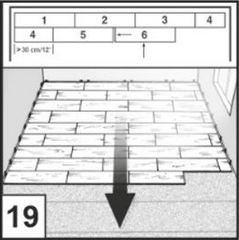
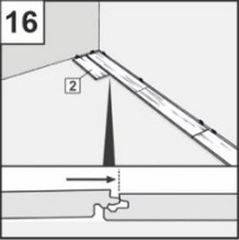
When attaching the 1st and 2nd rows, pay special attention to the fact that the transverse seam of the coating is laid with a length offset. Continue the procedure of laying the elements of the following coating rows according to the algorithm described above, taking into account the displacement of the transverse seams.
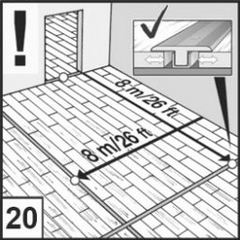
For surfaces with a length or width of more than 8 m, as well as for significantly inclined rooms, deformation seams (with a width of at least 2 cm) are required. The expansion joints will allow the floor to expand or contract accordingly during critical changes. Keep this in mind when installing the coating from one room to another. When passing through a doorway, the junction of the coating parts of neighboring rooms should have a compensating seam masked by a decorative profile.
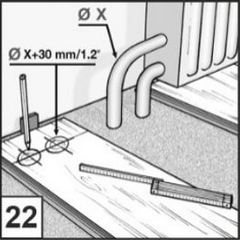
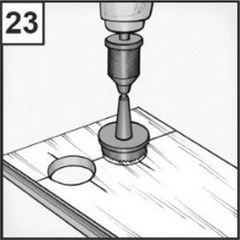
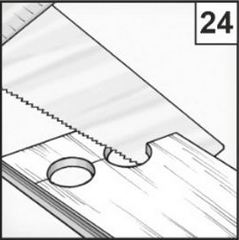
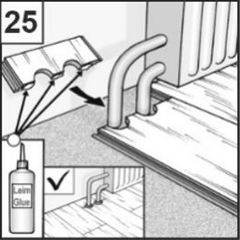
If there are heating pipes in the coating elements, it is necessary to drill holes whose diameter is 20 mm larger than the diameter of the pipe. Cut the elements along the diameters of the holes into two parts, lay the element, apply glue to the slices and fix the element until the glue dries.
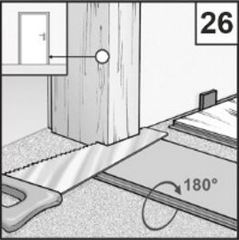
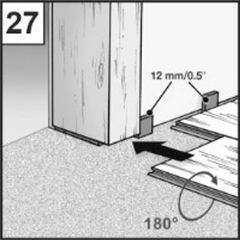
The wooden door box must be shortened so that the floor covering enters from below along with the substrate, including a gap of 2-3 mm. When laying, provide expansion joints at all doorways and at joints with other floor coverings.
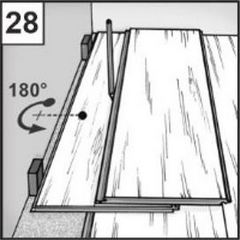
Turn the part of the last row 180 ° C. Mark the width of the element with a pencil, taking into account the compensation distance from the wall, and cut it off. Turn the part in reverse order, lay it down, fix the locking connection. Remove the spacer wedges along the entire perimeter of the room.
For the perfect completion of the procedure for laying laminate flooring and neat floor decoration, it is necessary to lay a skirting board around the perimeter of the room.
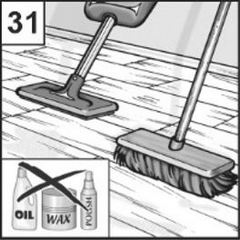
Laminate floor coverings do not require much care effort.
Clean up the garbage by sweeping or using a vacuum cleaner. Remove light dirt with a damp cloth. To remove more severe dirt, use special detergents designed for this floor covering, and then wipe with a damp cloth. In order not to disrupt the decorative layer, do not use abrasive cleaners.
Removal of complex stains such as:
- chocolate, juice, wine, fat – conventional cleaning products are suitable for cleaning (with a neutral pH);
- felt–tip pen, pencil, resin, lipstick, shoe polish, varnish, ink, cigarettes - suitable acetone, solvent for home use, methyl alcohol, special products for cleaning floor coverings (laminate);
- chewing gum, candle wax – wait for complete solidification, carefully remove with a scraper, clean with a restoring paste;
- oil, paint, tar, rubber sole marks and indelible marker – use a neutral cleaning agent applied to a clean light-colored cloth, if necessary, use a nail polish remover.
Attention: the coating is not subject to polishing!
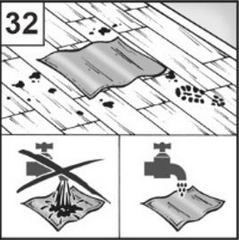
Wipe off traces and dirt with a thoroughly wrung cloth. Avoid standing water under all circumstances. Special care should be taken with regard to flower pots, vases standing on the coating. Use a waterproof support under the object.
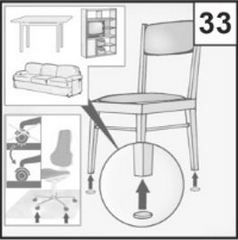
Protect the floor from scratches and dents! It is recommended to glue felt linings to the legs of furniture made of wood, metal or plastic. In public areas (offices), chairs with soft rollers should be used or a protective mat should be installed. You cannot move heavy furniture on the floor, and when rearranging it, it must be lifted.
FOLLOWING THE INSTALLATION AND CARE TIPS, YOUR FLOOR WILL DELIGHT YOU FOR MANY YEARS TO COME!
EASY LAMINATE LAYING AND PERFECT RESULTS FOR YOU!